I’ve been using the github copilots agent a bit for work and personal stuff. Some random findings below … Continue reading “github copilot agent dabblings”
Axle Energy “Grid event tomorrow”
With my ignorant hat on, I’m kind of surprised “The Grid” would know about something happening tomorrow at 8am … but what would I know. Now if only Octopus would start to pay me for what I’m exporting…
Hey ….Heads up: we’ll be exporting from your battery tomorrow xxxx-xx-xx from 08:00 to 09:00 to help relieve grid strain in your area.We’ll pay you £1/kWh for energy exported to the grid. You don’t need to do anything – we’ll handle this automatically and reset your settings afterwards.We’ll drop you an email letting you know how much you’ve earned as soon as we have the data (typically within 48 hours).
Thanks for helping out the grid,
Axle Energy
The solar journey begins
I’ve wanted to get solar panels etc on our house for ages; but the last house was shaded too much, and for this one other things felt like they needed doing first. Since then batteries have become more commonplace, and useful for load shifting.
Eventually at the start of this year I started looking again and getting a quote from e.g. heatable.co.uk which came out at £13k ish for panels and a battery (not inc scaffolding). Hmm…. I’ll wait and see I thought. Maybe the price will drop a bit more over the next year.
Fast forward a few months and Donald sticks his oar into the sea around Iran and everything goes a bit wonky and people predict bills will start to rise.
So, I know we spend roughly £1300 on electricity per year (4600kwh) and ~£800 on gas (12000kwh). I can’t do much about the cost of gas, and looked again at solar again.
Eventually, I decided to go for 19 x 450w panels (7kw fox inverter and 12kwh fox battery) through a local Bromsgrove solar installer ( https://gesolutionsuk.co.uk/ ) who did a reasonable price (somewhat cheaper than heatable and octopus, and seemed to be actually designed for my house – split over two roofs so one that faces south (ish) and a larger array on the west (ish) roof. They provided their own scaffolding, which also saved up to £1k?.
Once we decided to go for it, the installer said we’d have to wait for a G99 application. “They say it’ll take 4-6 weeks, although it’s usually quicker” he said. The next day we had the G99 sorted, followed quickly with a
“We can fit you in next Friday, Mr Goodwin”.
Crikey, shit’s getting real. “OK, make it so” I said.
Fast forward to it all being installed, and thankfully it went perfectly. I was starting to fret that the neighbours might complain, about the panels but instead got a “They look good, I might have to run a wire across to yours to steal some power while you’re on holiday!”.
The Fox android app seems pretty good (at least it’s idiot proof for me). Obviously at this time of year we generate more than we use, so we’re exporting and not buying in any electricity. I suspect my view of the app will change when we get into autumn and I want it to top up the battery on a cheap overnight tarriff, but we’ll see – perhaps I’ll have finally installed Home Assistant and Predbat at that point.
In the mean time I joined Axle Energy which might pay £10/month for not very much (well, I guess time will tell).
Aside from a few random comments like “I looked into panels on our house a bit ago, and I couldn’t see how it made sense financially…” to which I suspect my one daughter would answer “there are more costs than money involved in using fossil fuels”.
I remain a little skeptical of the solar quote’s ~6-8 year payback for the system, but we’ll see. I suspect with so many people getting solar this year that the export price will sink further so it won’t earn as much as it might otherwise have done. But if the price of electricity does rise, I’m hoping that 6-8 year payback period will be accurate.
And in the meantime, if we get a power cut, we can flip a magic switch and live in our own little bubble.
AI slop ?
It has recently been a passionate subject, and I’ve seen quite a few people (colleagues, community members) dismissing anything with “ai” in it as “slop”. Personally, I could perhaps understand that argument a year or so ago, but from more recent trials, the agents have progressed far enough that they’ve become very good (although they seem to still struggle a little if you’re asking them to use new APIs/library versions etc). Continue reading “AI slop ?”
tailscale account switching (further fumblings)
So, I’ve been using headscale for the last few months, combined with a cheap low spec VM from MythicBeasts.com (as my VPN “server” or at least exit node).
Recently, we decided to ditch using bastion ssh (jump) hosts at work, and move to use a VPN instead. This saves us from having a VM running ssh from listening for inbound connections.
Then I wondered how I could access both the work and my home tailscale networks from my laptop etc.
Initially I came across a blog/article discussing how to access two tailscale networks at once, which involved using linux network namespaces and adding various iptables rules etc. I sort of had a go, but it didn’t seem to want to work and it felt like it was going cause me trouble.
So I thought I’d probably have to keep switching tailscale networks somehow (e.g. tailscale down ; tailscale up ….–server … etc ). But this means I need to keep approving the it on the headscale side etc.
Then I saw there’s a ‘tailscale switch’ command ….
# tailscale switch --list
ID Tailnet Account
0101 my.headscale.server david*
1010 some-label david.goodwin@work.corp
and switching is just a “tailscale switch some-label” or “tailscale switch my.headscale.server”
That’s a bit easier than having to reauthenticate with the appropriate tailscale network etc.
A little over ten years ago ….
A little over 10 years ago, in a previous role/company, I designed and implemented a website hosting environment (with a catchy name of “w 3 p cloud”) to ….
- support WordPress/LAMP like environments
- have some sort of process/file isolation between sites, so a malware infection in one shouldn’t be able to spread/reach other sites
- have resource limits in place (the business also liked the idea of charging for more “firepower”, I just wanted to try and stop one site from doing a denial of service on others)
- be hosted in AWS (EC2) because it was cool to be moving to the cloud (despite the cost)
Eventually, I settled on using LXC containers with a Varnish server as a HTTP frontend router. Hosting within AWS (EC2) was basically a non-negotiable requirement and there weren’t many alternatives either.
A crude web UI was added for managing sites, which was quickly adapted to have a JSON API on top. Then background tasks were added – involving a job queue (originally gearman, later on beanstalk) and some management of iptables rules.
Fast forward to 2026, and it’s still (just about) in use.
As a programmer/developer, we often don’t think too much about the distant future when creating something. We’ve got immediate deadlines, and thinking more than 2-3 years is difficult. There are plenty of uncertainties in life afterall!
Over the years, there have been multiple upgrades of various bits (Varnish, PHP, Debian release, Linux kernels etc).
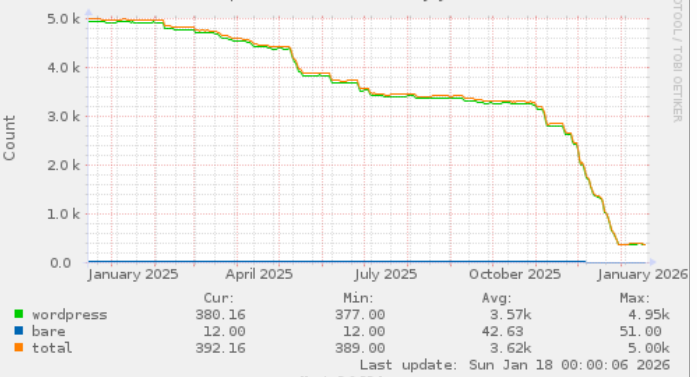
I think it had between 5-8k sites at it’s peak, and I often found it amusing when I realised I was ordering/using a website hosted on it as a member of the public.
Anyway, all good things come to an end, I guess …. and finally a migration to something bigger/better/faster/shinier has begun, as this count of sites being hosted in it shows:
Trying out headscale (tailscale vpn stuff)
For sometime, I’ve been using Wireguard for a VPN to use when I’m out and about etc.
As I’m fairly stupid, I used wg-quick to generate the config – however when the config looks a bit like this –
[Peer]

PublicKey = cm+t2u0giNynMkcX1+afPu6SlKyLMeTe8iWKhT1FsDk=

AllowedIPs = 10.0.0.13/32

Endpoint = 192.168.122.13:51820

....
I began to find management became a problem – i.e which computer is that exactly ?
wg show does give you something a bit like this –
...

peer: cm+t2u0giNynMkcX1+afPu6SlKyLMeTe8iWKhT1FsDk=

  endpoint: 192.168.122.13:51820

  allowed ips: 10.0.0.13/32

...
which is sort of useful, but it still doesn’t tell me a human name. I’ve tried leaving comments in the config before, but they just get wiped out.
I’ve often thought about using TailScale, but wasn’t overly happy with the idea of some third party being involved. Eventually I came across headscale – which offers a self-hosted option for the backend (so your devices use the tailscale frontend).
After a bit of poking around over the weekend I now have this: headscale nodes list
which is a bit nicer –

I’m still pretty new to using Tailscale for a VPN, but I did at least eventually get my phone to join the network, and everything seems to work.
It’s sort of interesting that tailscale doesn’t add an entry into your routing table – but instead adds a few iptables rules in (nat) to mess around with things.
Azure – moving a virtual machine scale set to have trusted launch and encryptionAtHost
I have a legacy virtual machine scale set which was not created with Encryption at Host and with Trusted Launch.
Continue reading “Azure – moving a virtual machine scale set to have trusted launch and encryptionAtHost”
It’s always DNS …. (unbound / domain signing stuff)
Yesterday, I spent most of my day wondering what was wrong with my unbound configuration…. as a TL;DR, if you’re creating a new TLD (e.g. foo.lan) you may need to disable DNSSEC checks on it within unbound’s config using the ‘domain-insecure‘ setting –
Continue reading “It’s always DNS …. (unbound / domain signing stuff)”
Initial foray into Terraform / OpenTofu
So over the last couple of weeks at work, I’ve been learning to use Terraform (well OpenTofu) to help us manage multiple deployments in Azure and AWS.
The thought being that we can have a single ‘plan’ of what a deployment should look like, and deviations will be spotted / can be alerted on.
I was tempted to try and write a contrived article showing how you could create a VM in AWS (or Azure) using Terraform, but I’m not sure I’ve got anything to add over the 101 other articles on the internet.
Vaguely useful things :
- The tofu configuration is much quicker to write than e.g. trying to talk to AWS using it’s SDK (something I did do about 7-8 years ago)
- You can split the config up into multiple .tf files within your working directory, the tool just merges them all together at run time
- Having auto-complete in an editor is pretty much necessary (in my case, PHPStorm)
- tofu is quite quick to run – it doesn’t take all that long to check the state of the known resources and the config files, which is good; unfortunately Azure often takes sometime to do something on its end…
- I’ve yet to see any point in writing a module to try and encapsulate any of our configuration as I can’t see any need to re-use bits anywhere
I’m not sure how we’re going to go about reconciling our legacy (production) environment with a newer / shiny one built with tofu though.